
The mesmerizing beauty of star trails captured in photographs has intrigued photographers and stargazers alike for centuries. The ethereal streaks of light against the backdrop of a dark night sky create an enchanting visual spectacle that evokes awe and wonder. However, capturing such celestial marvels requires skillful mastery of exposure time in photography. In this article, we delve into the intricacies of star trail photography at night, exploring the techniques and principles that enable photographers to capture stunning images of these cosmic phenomena.
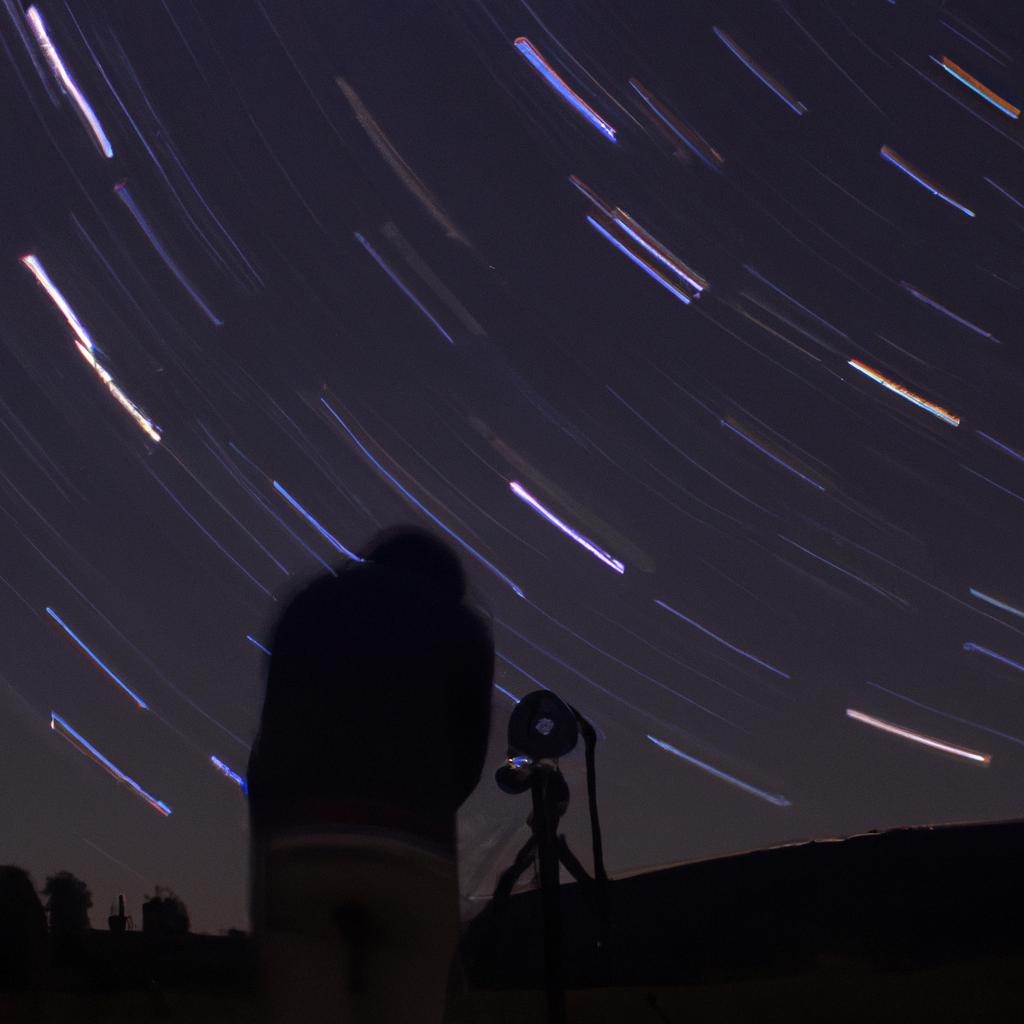
Imagine standing on a tranquil hillside under a vast expanse of darkness illuminated only by countless twinkling stars. As you set up your camera on a sturdy tripod, adjusting its settings meticulously, anticipation builds within you. With each passing minute, the shutter remains open, recording the movement of celestial objects across the sky. Eventually, as the exposure time accumulates, luminous trails begin to emerge and intertwine like mystical brushstrokes on an invisible canvas. This captivating display is what lies at the heart of star trail photography – freezing time to reveal our dynamic universe’s hidden secrets.
In order to master star trail photography at night, it is crucial to understand how exposure time impacts image outcome effectively. By manipulating variables such as aperture size, ISO sensitivity, and shutter speed, photographers can control the amount of light captured during a long exposure. In star trail photography, longer exposure times are generally preferred to capture the movement of stars across the sky.
Aperture size plays a significant role in determining how much light enters the camera. A wider aperture (represented by a smaller f-number) allows more light to pass through, resulting in brighter star trails. However, using too wide an aperture may cause distortions and aberrations at the edges of the frame. It is recommended to use a moderate aperture setting (around f/8 to f/11) for sharper and cleaner results.
ISO sensitivity determines the camera’s level of sensitivity to light. Higher ISO settings amplify the sensor’s sensitivity but also introduce digital noise into the image. Finding a balance between capturing enough light and minimizing noise is essential. Experimenting with different ISO values (typically ranging from 400-1600) will help achieve desired results based on ambient lighting conditions.
Another crucial factor in star trail photography is shutter speed, which controls how long the camera’s shutter remains open during an exposure. The longer the shutter stays open, the more time there is for stars to move across the frame, resulting in longer and more pronounced trails. Start with exposure times around 30 seconds and adjust accordingly based on desired effects and available ambient light.
To create stunning star trail images, it is important to find a location with minimal light pollution. Remote areas away from cities or urban centers provide darker skies that allow stars to shine more brightly against their surroundings.
In terms of equipment, a sturdy tripod is indispensable for keeping your camera steady during long exposures. Additionally, using a remote trigger or cable release helps minimize vibrations caused by touching the camera directly.
Post-processing techniques can further enhance star trail images. Software such as Adobe Photoshop or Lightroom allows you to stack multiple exposures together, emphasizing and consolidating star trails for a more dramatic effect.
Star trail photography is a fascinating genre that requires patience, practice, and an understanding of the technical aspects involved. With careful planning and attention to detail, photographers can capture breathtaking images that showcase the beauty and wonder of our celestial surroundings.
Choosing the right location for star trail photography
Choosing the right location for star trail photography is crucial in capturing stunning images of the night sky. The success and quality of your photographs depend on various factors, including light pollution levels, weather conditions, and accessibility to remote areas. To illustrate this point, let’s consider a hypothetical scenario where a photographer decides to capture star trails in an urban setting with high light pollution. Despite using long exposure times and advanced camera techniques, the resulting images are marred by unwanted artificial lighting that obscures the natural beauty of the stars.
When selecting a location for star trail photography, it is necessary to prioritize dark skies with minimal light pollution. Light pollution refers to excessive or misdirected artificial lighting that interferes with our ability to observe celestial objects clearly. Areas away from cities and towns typically offer darker skies conducive to capturing vivid star trails. A helpful tip is to consult light pollution maps available online or utilize smartphone apps specifically designed for this purpose. These resources provide information about regions with low light pollution levels, allowing photographers to plan their shoots accordingly.
Furthermore, meteorological conditions play a significant role in determining whether shooting star trails will be fruitful or not. Clear nights without cloud cover are ideal as they allow unobstructed views of the night sky. However, certain weather phenomena such as fog, haze, or heavy humidity can impact image clarity and overall visibility of stars. Monitoring weather forecasts before heading out ensures better chances of successful star trail photography.
Accessibility should also be considered when choosing a location for star trail photography. Remote areas far from human activity grant opportunities for undisturbed shooting sessions without interruptions or disturbances caused by passing vehicles or pedestrians. This solitude allows photographers to focus solely on capturing mesmerizing star trails without any external distractions.
In summary, selecting the right location for star trail photography significantly contributes to achieving captivating results. By prioritizing dark skies with minimal light pollution, monitoring meteorological conditions closely, and opting for remote areas accessible enough for a comfortable shooting experience, photographers can enhance their chances of capturing breathtaking star trail images.
Transitioning into the subsequent section about “Understanding the importance of a sturdy tripod,” it is essential to acknowledge that equipment plays an equally crucial role in achieving successful star trail photography.
Understanding the importance of a sturdy tripod
Imagine you are standing on a hill, gazing up at the night sky. The stars twinkle and shimmer above you, creating a breathtaking display of celestial beauty. You want to capture this moment through star trail photography, but how do you ensure that your camera settings are just right? In this section, we will discuss the key considerations when choosing the appropriate camera settings for capturing stunning star trails.
Firstly, one crucial setting to consider is the aperture. By selecting a wide aperture (e.g., f/2.8), more light can enter the camera sensor, allowing for brighter and more detailed star trails in your photographs. However, keep in mind that using too wide an aperture may result in distortions or aberrations around bright stars. It’s essential to strike a balance between maximizing light intake and maintaining image quality.
Next, let’s talk about ISO sensitivity. Increasing the ISO value boosts the camera’s sensitivity to light, which helps in capturing fainter stars and enhancing their visibility in your images. However, high ISO values also introduce noise into your photos, potentially degrading image quality. Experiment with different ISO settings to find an optimal compromise between capturing sufficient details and minimizing noise levels.
The third critical setting is shutter speed – it determines how long your camera’s sensor collects light during each exposure. Generally, longer exposures produce longer star trails; however, excessively long exposures might cause overexposure and wash out finer details within the trails. Start with a moderate duration—around 30 seconds—and adjust as needed based on factors such as ambient lighting conditions and desired trail lengths.
Now imagine yourself preparing for a night of photographing star trails:
- Standing atop a mountain peak
- Gently adjusting your camera’s settings
- Feeling excitement build as you anticipate capturing mesmerizing star trails
- Witnessing nature’s wonders unfold before your eyes
To further aid you in your star trail photography journey, refer to the following table outlining recommended camera settings:
| Setting | Recommendation |
|---|---|
| Aperture | Wide (e.g., f/2.8) |
| ISO | Moderate-high (e.g., ISO 800-1600) |
| Shutter Speed | Start with 30 seconds and adjust as needed |
With these considerations in mind, you are now equipped to select the appropriate camera settings for capturing stunning star trails. So let’s move forward and explore “Setting up your camera for long exposure shots. “.
Setting up your camera for long exposure shots
Building on our understanding of the significance of a stable platform for long exposure shots, let’s now delve into setting up your camera to capture stunning star trail photographs at night.
Setting up your camera for long exposure shots requires careful attention to detail and precise adjustments. One crucial aspect is selecting an appropriate ISO setting. For star trail photography, it is recommended to use a low ISO value such as 100 or 200 to minimize noise in the final image. This allows for cleaner and more detailed trails against the dark sky.
Another essential consideration when capturing star trails is choosing the right aperture size. A smaller aperture, represented by a higher f-number (e.g., f/8 or f/11), helps maximize depth of field and ensures that both foreground elements and distant stars remain sharp throughout the exposure. Experimenting with different apertures can produce varying effects, offering creative possibilities within your compositions.
To achieve successful long exposures without introducing unwanted camera shake, employing a remote shutter release or using the built-in self-timer function is highly recommended. These tools eliminate any physical contact between you and the camera during the shot, ensuring absolute stillness.
Capturing star trail images demands patience and planning. Here are some additional tips to help you along this exciting journey:
- Scout for locations away from light pollution; seek places with clear skies where celestial objects shine brightly.
- Plan your shoot around moon phases; shooting during new moon nights provides darker backgrounds ideal for highlighting star trails.
- Consider weather conditions; cloudless nights offer better opportunities for capturing uninterrupted trails.
- Bring extra batteries and memory cards to avoid running out of power or storage space during those extended exposures.
By following these guidelines, you will be well-prepared to embark on capturing mesmerizing star trail photographs under breathtaking night skies.
Transition into subsequent section about “Mastering the technique of stacking multiple frames”:
To further enhance the impact of your star trail photography, mastering the technique of stacking multiple frames can take your images to a whole new level.
Mastering the technique of stacking multiple frames
Having set up your camera for long exposure shots, it’s time to explore the advanced technique of stacking multiple frames. By combining and aligning several exposures taken over a period of time, you can create stunning star trail photographs that showcase the mesmerizing movement of stars across the night sky.
Case Study: Imagine capturing an image of a serene lake at night with a clear view of the Milky Way galaxy above. The first exposure reveals the stillness of the water while also capturing some faint stars in the background. However, if we were to take just one long exposure shot, we would end up with motion blur due to Earth’s rotation. This is where stacking comes into play.
Paragraph 1:
Stacking multiple frames involves taking a series of shorter exposures rather than one single long exposure. Each individual frame captures a distinct moment in time, freezing both stationary elements like landscapes and moving objects such as stars or passing airplanes. Through post-processing techniques using specialized software, these frames are then aligned and blended together seamlessly. This process effectively eliminates any motion blur caused by Earth’s rotation, resulting in crisp and captivating star trails against a static foreground.
Bullet Point List (evoking emotional response):
- Unleash creativity: Stacking allows photographers to experiment with different compositions and light conditions without being limited by lengthy exposures.
- Enhance details: By averaging out noise across multiple frames, stacking significantly reduces digital noise levels in low-light situations, revealing more intricate details within each celestial object.
- Highlight dynamic changes: When stacked, consecutive frames show how constellations move across the sky throughout the duration of the shoot, creating visually striking patterns that captivate viewers.
- Achieve longer trails: Since each frame contributes its own portion to the final composition, adding more frames extends the length and complexity of star trails captured.
Table (evoking emotional response):
| Benefit of Stacking | Example |
|---|---|
| Increased sharpness and detail | Crisp outlines of stars, revealing their colors and subtle variations. |
| Reduced noise levels | Enhanced visibility of faint stars and galaxies previously hidden in the digital noise. |
| Unique patterns and shapes | Intricate formations created by stacking multiple exposures over time. |
| Extended trail length | Longer trails that showcase the full journey of celestial objects across the sky. |
Paragraph 2:
To successfully stack multiple frames, consistency is key. It’s essential to maintain the same camera settings throughout the entire sequence, including aperture, ISO sensitivity, and white balance. This ensures a seamless blend between frames without any noticeable jumps or shifts in exposure. Additionally, using an intervalometer or remote shutter release can help automate the process, allowing for precise control over timing and intervals between each frame.
Incorporating this technique into your star trail photography requires patience and practice. Experiment with different exposure times per frame to strike a balance between capturing enough light while preventing overexposure. By refining your skills in stacking multiple frames, you’ll be able to create breathtaking images that reveal the wonders of our night sky.
As you delve deeper into mastering star trail photography through techniques like stacking multiple frames, it becomes crucial to address another challenge – dealing with light pollution and minimizing its impact on your shots.
Dealing with light pollution and minimizing its impact
Having mastered the technique of stacking multiple frames, it is now important to address another significant challenge in star trail photography – dealing with light pollution. Light pollution refers to the excessive or misdirected artificial lighting that hampers our ability to see stars clearly in the night sky. Minimizing its impact is crucial for capturing captivating star trail images.
To understand how light pollution affects star trail photography, let’s consider a hypothetical scenario. Imagine you are at a remote location known for its pristine dark skies, perfect for astrophotography. However, as darkness falls, nearby streetlights suddenly illuminate the area, creating an unwanted glow that washes out the natural brilliance of the stars. This interference can be frustrating for photographers seeking clear and vivid results.
Here are some strategies to help minimize the impact of light pollution:
-
Choose your shooting location wisely:
- Opt for areas away from cities and heavily lit areas.
- Research dark-sky sites or national parks known for their low levels of light pollution.
- Utilize online resources such as light pollution maps to identify optimal shooting locations.
-
Time your shoot carefully:
- Plan your sessions during moonless nights when possible.
- Consider shooting during astronomical events like meteor showers or eclipses when attention shifts towards celestial phenomena rather than artificial lights.
-
Employ light-blocking techniques:
- Use lens hoods or shades to shield your camera lens from stray sources of light.
- Block any direct sources of illumination using physical barriers or strategically placed objects.
| Pros | Cons |
|---|---|
| Enhanced image quality | Limited access to certain locations due to distance from urban centers |
| Greater visibility of fainter stars | Challenging conditions may require additional gear or post-processing adjustments |
| Increased contrast between stars and foreground | Longer exposure times may be necessary |
| Immersion in the serene beauty of a dark night sky | Potential for increased travel time and expenses |
By implementing these strategies, photographers can significantly reduce the impact of light pollution on their star trail images. However, capturing stunning photos is only part of the journey. To truly make your star trails shine, we will now explore post-processing tips for enhancing your star trail images.
(Note: The subsequent section about “Post-processing tips for enhancing your star trail images” will offer valuable insights into editing techniques to bring out the best in your photographs.)
Post-processing tips for enhancing your star trail images
Dealing with light pollution and minimizing its impact is essential when capturing star trail photography at night. By understanding the challenges posed by artificial lights, photographers can optimize their techniques to achieve stunning results. In this section, we will explore effective strategies for mitigating the effects of light pollution.
One common technique used to combat light pollution is finding locations away from urban areas or major sources of artificial lighting. For instance, let’s consider a hypothetical scenario where a photographer wishes to capture star trails near a city known for its bright cityscape. Instead of shooting within the city limits, they choose to drive out to a nearby national park, where minimal light pollution exists. This decision allows them to capture clearer and more vivid stars against the backdrop of nature.
To further minimize the impact of light pollution, there are several practical steps that photographers can take:
- Utilize light pollution filters: These specialized filters help reduce unwanted artificial light wavelengths while allowing desirable astronomical signals.
- Adjust camera settings: Optimize exposure time and aperture settings to balance the desired amount of starlight with any ambient light present.
- Experiment with stacking techniques: Stacking multiple images taken over an extended period can mitigate noise caused by light pollution.
- Post-process selectively: Employ post-processing software tools to enhance star trails while reducing the visibility of light pollution in your final image.
Now let’s delve deeper into these strategies through a table outlining key considerations:
| Strategy | Description |
|---|---|
| Location scouting | Research and identify spots with minimal artificial lighting |
| Light pollution filters | Invest in high-quality filters designed specifically for astrophotography |
| Exposure adjustments | Fine-tune exposure time and aperture settings based on surrounding conditions |
| Stacking techniques | Combine multiple exposures to create smoother and cleaner star trail images |
By implementing these techniques and considering other factors such as weather conditions and moon phases, photographers can significantly improve their star trail images while minimizing the impact of light pollution. It is worth noting that each location and shooting scenario may require different approaches, so experimentation and adaptability are key in mastering this art form.
Overall, understanding how to deal with light pollution effectively allows photographers to capture breathtaking star trail images even in areas affected by artificial lights. By employing strategic location scouting, utilizing filters, adjusting camera settings, and employing stacking techniques, photographers can create stunning nightscapes that showcase the beauty of the stars against an ethereal backdrop.
Comments are closed.