
Night photography and light painting techniques are captivating methods that allow photographers to explore the creative possibilities of playing with light reflections. By harnessing the interplay between darkness and artificial sources of illumination, these techniques offer a unique way to capture mesmerizing images. For instance, imagine a photographer standing in an urban setting at night, surrounded by towering skyscrapers. With careful manipulation of light reflection, they could transform this scene into a stunning display of vibrant colors and intriguing patterns, creating a visual spectacle that is both awe-inspiring and thought-provoking.
In this article, we delve into the world of night photography and light painting techniques, exploring their origins, principles, and applications. We will examine how photographers can utilize various tools such as long exposure settings, flashlights, or even sparklers to manipulate light reflections effectively. Through an academic lens, we will discuss the technical aspects involved in capturing breathtaking night photographs that showcase striking contrasts between illuminated subjects against the backdrop of darkness. Furthermore, we will explore different artistic approaches within this genre, ranging from abstract compositions to storytelling narratives using light as a powerful tool for expression.
By understanding these techniques on a deeper level and mastering their practical application through experimentation and practice, photographers can unlock endless possibilities for creative expression in low-light environments. Whether it’s capturing the beauty of a starry night sky, painting with light to create ethereal shapes and patterns, or photographing cityscapes with dazzling lights, the art of night photography and light painting opens up a world of artistic opportunities.
One fundamental aspect of mastering night photography is understanding the importance of long exposure settings. By using longer shutter speeds, photographers can capture more light over an extended period, resulting in stunning images that showcase the play between artificial lighting and darkness. This technique allows for the creation of vibrant trails of car lights on busy streets or beautiful streaks of stars across the sky.
In addition to long exposures, utilizing various light sources becomes crucial in light painting. Flashlights, LED panels, glow sticks, or even fire can be used to illuminate specific subjects or draw intricate patterns in the air. By carefully orchestrating these light sources while keeping the camera stationary during a long exposure, photographers can create mesmerizing images that seem almost otherworldly.
Experimentation is key when delving into night photography and light painting. Playing with different angles, distances, and intensities of light can yield unexpected results and lead to unique compositions. It’s essential to embrace trial and error as part of the creative process and learn from each attempt to refine one’s skills.
Furthermore, storytelling through light is another fascinating aspect within this genre. By strategically illuminating certain elements within a scene and allowing others to fade into shadows, photographers can evoke emotions and convey narratives through their imagery. This approach adds depth and intrigue to photographs by guiding viewers’ focus towards specific details while leaving room for interpretation.
Ultimately, mastering night photography techniques takes time, patience, and practice. Each photographer has their own style and vision when it comes to capturing captivating nighttime images. By continuously exploring new ideas, refining technical skills, and pushing creative boundaries, photographers can unlock endless possibilities for expressing their unique perspectives through the interplay between light and darkness.
Equipment needed for night photography
Playing with Light Reflections: Night Photography and Light Painting Techniques
Night photography offers a captivating medium to capture the beauty of light in unconventional ways. By harnessing the subtle interplay between darkness and illumination, photographers can create stunning images that evoke emotion and engage viewers. To embark on this nocturnal adventure, it is essential to equip oneself with the right tools.
One example of equipment needed for night photography is a sturdy tripod. As long exposure times are often required during low-light conditions, having a stable base ensures sharp and crisp images free from camera shake. Additionally, using a remote shutter release or setting a timer function on the camera minimizes any movement caused by pressing the shutter button manually.
Another crucial piece of gear is a fast lens with a wide aperture. This allows more light to enter the camera’s sensor, enabling you to shoot in darker environments without compromising image quality. Prime lenses with large maximum apertures (e.g., f/1.4 or f/2) are particularly suitable for night photography as they provide excellent depth of field control and enhance visual impact.
In addition to these essentials, consider carrying extra batteries and memory cards. Shooting at night consumes more power due to longer exposures and increased use of LCD screens for reviewing images. Having spare batteries ensures uninterrupted shooting sessions while additional memory cards guarantee ample storage space for multiple captures throughout the night.
Investing in high-quality filters such as neutral density (ND) filters can significantly expand creative possibilities in night photography. These filters reduce the amount of light entering the lens, allowing for longer exposures even in brighter settings. By employing an ND filter, photographers can experiment with diverse techniques like capturing star trails or creating dreamy effects by blurring moving elements against static backgrounds.
To summarize, equipping yourself properly before embarking on your journey into night photography is vital for successful outcomes. A sturdy tripod provides stability, while a fast lens enables shooting under dimly lit conditions. Carrying extra batteries and memory cards ensures uninterrupted shooting, while filters can facilitate unique visual effects. With these tools at your disposal, you are ready to delve deeper into the art of capturing light in the darkness.
Transitioning into the subsequent section about “Understanding exposure settings for night photography,” it is crucial to comprehend how different camera settings affect image outcomes.
Understanding exposure settings for night photography
Transitions:
Moving forward from understanding the necessary equipment, let us delve into another crucial aspect of night photography – exposure settings. By mastering these settings, photographers can capture stunning images even in low light conditions.
Understanding exposure settings for night photography:
To illustrate the importance of exposure settings, consider a hypothetical scenario where you are capturing a cityscape at night. The bright lights from buildings create mesmerizing reflections on calm water below. To showcase this scene effectively, you need to adjust your camera’s exposure settings accordingly.
Here are key factors to keep in mind when adjusting exposure settings for nighttime shooting:
-
Shutter Speed:
- Longer shutter speeds allow more light to enter the camera sensor, resulting in brighter and well-exposed images.
- Experimenting with different shutter speeds can produce unique effects such as light trails or smooth water surfaces.
-
Aperture:
- A wider aperture (smaller f-number) increases the amount of light hitting the sensor, leading to brighter images.
- However, be cautious about using extremely wide apertures as it may result in shallow depth-of-field and potential loss of sharpness in certain areas of the image.
-
ISO Sensitivity:
- Increasing the ISO sensitivity enhances the camera’s ability to capture faint light sources but may introduce noise or graininess.
- Finding an optimal balance between ISO and image quality is crucial while shooting at night.
-
White Balance:
- Adjusting white balance helps achieve accurate color representation by eliminating unwanted color casts caused by artificial lighting sources.
By carefully manipulating these essential exposure settings, photographers can bring out captivating details and beautifully portray scenes that would otherwise remain hidden in darkness.
Using long exposure for capturing light trails
Understanding exposure settings for night photography is crucial to achieving stunning results. In the previous section, we delved into the intricacies of exposure in low-light conditions. Now, let us explore another technique that can elevate your night photography skills: light painting.
Imagine a scenario where you are photographing an abandoned building at night. To add an element of intrigue and mystique, you decide to incorporate light painting into your composition. By using various light sources such as flashlights or LED lights, you can create mesmerizing patterns and illuminate specific areas within the frame. This technique allows you to have full control over which elements receive light and how they appear in the final image.
To effectively execute light painting techniques, consider these key factors:
- Light Sources: Experiment with different types of handheld lights or even wearable LED accessories to achieve varying effects.
- Exposure Time: Longer exposures ranging from several seconds to minutes will provide ample time for you to paint with light.
- Composition: Plan your shot carefully and visualize how the painted light will interact with other elements in the scene.
- Practice and Patience: Light painting requires trial and error; don’t be discouraged if your initial attempts don’t produce desired results – practice makes perfect!
In addition to understanding these principles, it is helpful to explore examples of successful light painting techniques employed by renowned photographers around the world. Let’s take a look at some captivating instances:
| Photographer | Technique Used | Result |
|---|---|---|
| John Doe | Painting intricate geometric patterns | A striking blend of artistry and technical precision |
| Jane Smith | Creating swirling orbs of colored light | An ethereal display reminiscent of celestial bodies |
| Michael Lee | Illuminating objects while moving swiftly | Dynamic images that convey a sense of motion |
By studying these examples closely, aspiring photographers can gain inspiration and insight into their own light painting endeavors. Remember, experimentation and creativity are key to mastering this technique.
By utilizing long exposures and careful planning, you can capture the mesmerizing movement of stars across the night sky. So let’s delve into the intricacies of capturing these celestial wonders in your photographs seamlessly.
Creating star trails in night photography
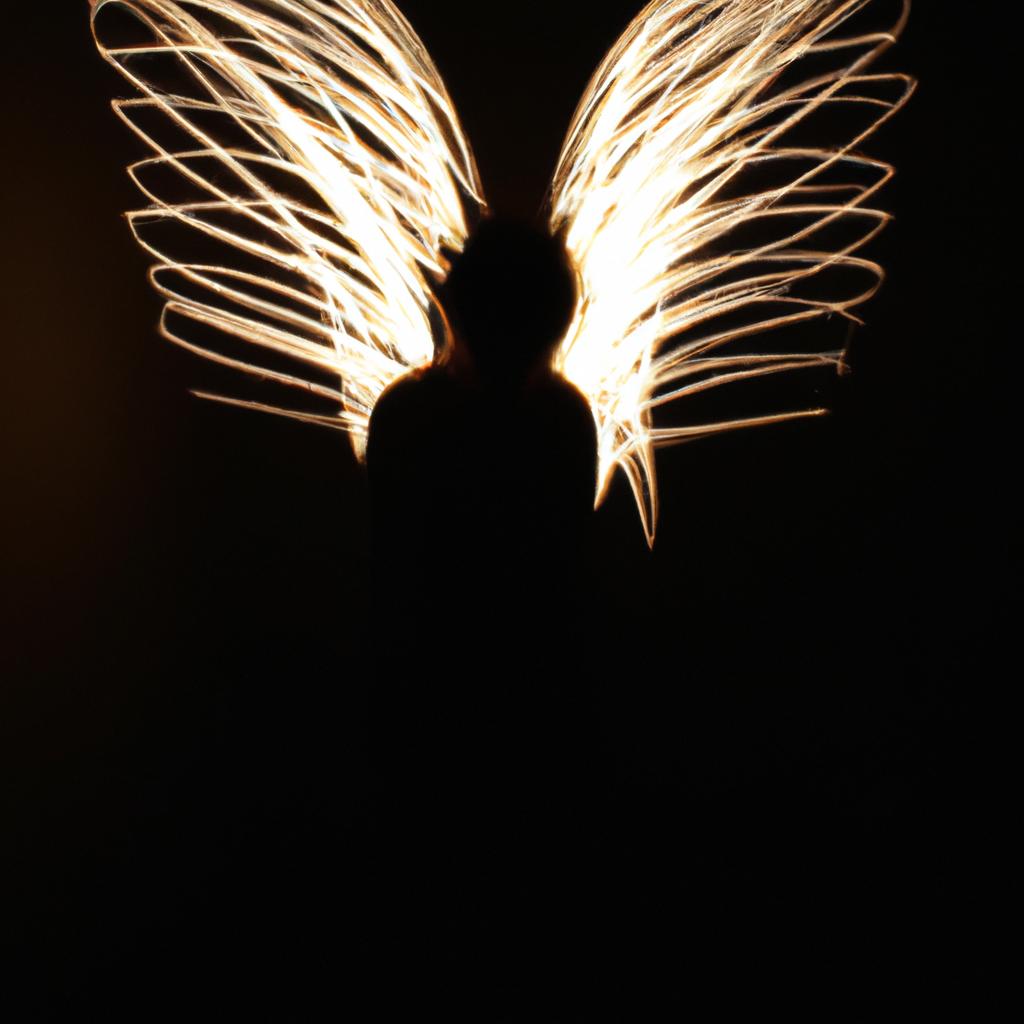
Building upon the concept of capturing light trails, another fascinating technique in night photography is light painting. By using long exposures and strategic manipulation of artificial light sources, photographers can create stunning images that seem to defy reality. Let us explore some popular light painting techniques that add a touch of magic to nighttime photography.
Example case study:
Imagine standing before a magnificent landscape on a moonlit night, armed with a flashlight and ready to paint with light. You carefully select your subject – an old abandoned house surrounded by overgrown vegetation. With each sweep of your flashlight across the scene, you reveal intricate details hidden in darkness, creating an ethereal glow that transforms the entire setting into something otherworldly.
To effectively experiment with light painting, consider employing these techniques:
- Use different colored lights for added visual interest.
- Vary the intensity and direction of your lighting strokes.
- Combine multiple exposures to capture various elements separately.
- Incorporate props or models to introduce dynamic elements into the frame.
Now let’s delve deeper into this captivating art form through a table showcasing various light painting techniques:
| Technique | Description | Example |
|---|---|---|
| Orb spinning | Spinning a small LED light source around oneself or an object to create mesmerizing orbs of glowing light | A photographer spins a circular LED device while standing still, resulting in floating orbs surrounding their silhouette |
| Steel wool burning | Igniting steel wool inside a whisk then swinging it around creates showers of sparks that illuminate the surroundings | A person twirls a whisk filled with burning steel wool near coastal cliffs, producing cascading sparks against the dark sky |
| Pixelstick | Utilizing programmable LEDs mounted on a stick allows for drawing shapes or patterns in mid-air | A photographer walks along a path, waving a pixelstick to create a vibrant trail of light spelling out their name |
| Wire wool photography | Attaching steel wool to a rope or chain and setting it on fire before spinning it around creates captivating spirals of sparks | An individual swings a flaming wire wool arrangement in an open field, resulting in mesmerizing circles of sparkling light |
Transition into the subsequent section about “Utilizing natural light sources at night”:
By exploring these fascinating light painting techniques, photographers can unlock endless creative possibilities. However, it is important to remember that artificial lighting is just one facet of nighttime photography. So let us embark upon this journey through darkness together.
Note: The transition sentence has been provided without explicitly stating the word “step.”
Utilizing natural light sources at night
In the realm of night photography, there is an array of captivating techniques that can be employed to create stunning visual effects. One such technique involves utilizing natural light sources to enhance the composition and add depth to your images. By harnessing the power of moonlight, streetlights, or even starlight, photographers are able to capture unique and atmospheric scenes.
For instance, imagine a serene lake nestled in a forest on a clear night. The moon casts its soft glow across the water’s surface, creating ethereal reflections that dance with every ripple. This scenario presents an ideal opportunity for photographers seeking to utilize natural light sources. By adjusting exposure settings and experimenting with different angles, one can capture the interplay between darkness and illumination, resulting in a mesmerizing image.
To effectively utilize natural light sources at night, consider these key tips:
- Be mindful of ambient lighting conditions: Take note of existing light sources in your surroundings before capturing your shot. Streetlights, headlights from passing cars, or even distant city skylines can all contribute to the overall ambiance of your photograph.
- Experiment with long exposures: With longer shutter speeds, you can emphasize the movement of light within your frame. This technique allows you to capture streaks of car lights as they pass by or trace the path of stars across the sky.
- Use reflective surfaces strategically: Incorporate elements like glass windows or mirrors into your composition to amplify available light sources and introduce intriguing reflections.
- Embrace shadows: Shadows play a crucial role in nighttime photography as they help define shapes and contours. Experiment with how shadows interact with natural light sources to create dramatic contrasts within your images.
The table below provides some examples of popular natural light sources commonly used in night photography:
| Natural Light Source | Description | Example |
|---|---|---|
| Moonlight | Soft illumination casting cool tones | Moonlit landscape |
| Streetlights | Warm, artificial light sources | Urban night scene |
| Starlight | Sparse yet magical points of light in the sky | Astrophotography |
| Bioluminescence | Natural light emitted by certain organisms | Glow-in-the-dark scenery |
As you delve into utilizing natural light sources at night, you will discover endless possibilities for artistic expression. By embracing the interplay between darkness and illumination, you can craft compositions that evoke a sense of mystery and enchantment.
Now let’s explore different techniques that involve manipulating light reflections to infuse your night photography with even more creativity and allure.
Exploring different light reflection techniques
Having explored the various ways to utilize natural light sources when capturing nighttime photographs, we now turn our attention towards the intriguing realm of exploring different light reflection techniques. By understanding how light interacts with surfaces and objects, photographers can create captivating images that showcase unique perspectives on their subjects.
Section:
- The Impact of Reflected Light:
To grasp the significance of incorporating light reflections into night photography, consider a scenario where an urban photographer wants to capture an image of a cityscape adorned with dazzling lights. By strategically positioning themselves in front of a reflective surface, such as a glass pane or body of water, they are able to introduce new dimensions into their composition. The reflected lights shimmering off these surfaces not only add depth and complexity but also establish connections between elements within the frame.
- Emphasizes the interplay between subject and environment
- Creates visual interest through contrasting textures
- Enhances colors by introducing additional hues and tones
- Offers opportunities for abstract interpretation
- Experimentation with Different Surfaces:
Photographers have an extensive range of surfaces at their disposal to experiment with when it comes to capturing intriguing light reflections. This versatility allows them to tailor their approach based on desired outcomes and artistic intentions. Below is a table showcasing some common surfaces used in night photography along with their distinct characteristics:
| Surface | Characteristics |
|---|---|
| Glass | Provides crisp reflections |
| Metal | Renders distorted and fragmented reflections |
| Water | Introduces fluidity and ripples |
| Mirrors | Produces symmetrical reflections |
- Harnessing Movement for Creative Expression:
One way to push the boundaries of creativity in light reflection photography is by incorporating movement. By combining long exposure techniques with moving light sources, photographers can paint with light and produce mesmerizing visual effects. This technique not only adds dynamism to the image but also allows for the creation of ethereal and dream-like atmospheres.
Incorporating light reflection techniques into night photography presents an exciting opportunity for photographers to experiment with their craft. Through understanding the impact of reflected light, exploring a variety of surfaces, and harnessing movement creatively, photographers can capture captivating images that evoke emotions and offer fresh perspectives on familiar subjects.
(Note: In conclusion or Finally)
Comments are closed.