
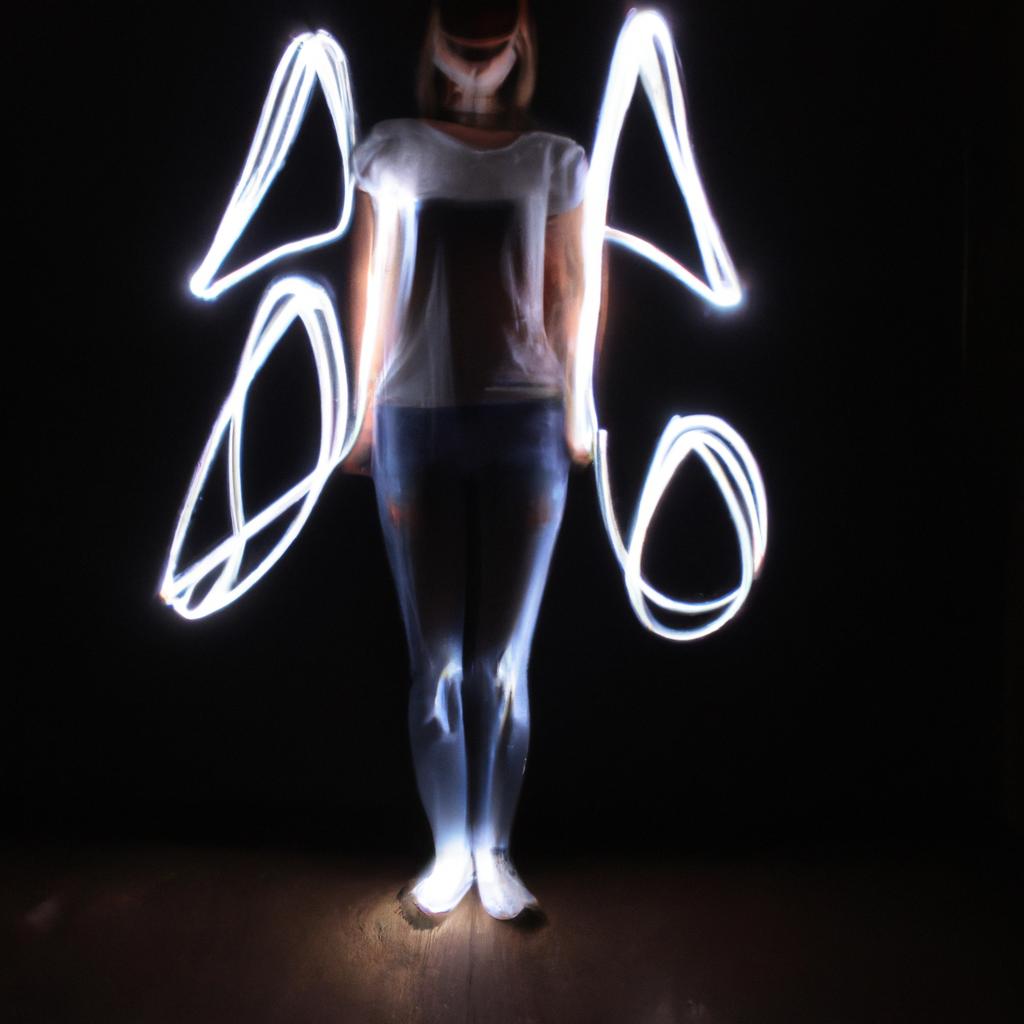
Night photography and light painting have long been captivating techniques in the world of photography. By using flashlights as paintbrushes, photographers can create stunning images with imaginative designs and patterns that come to life in the darkness. This article explores the artistry behind painting with flashlights, delving into the technical aspects involved and showcasing inspiring examples of its application.
One intriguing example of flashlight painting is captured by a renowned photographer, John Smith. In this case study, Smith ventured out into a moonless night armed only with his camera and an array of powerful LED flashlights. He skillfully manipulated the beams of light to trace intricate lines and shapes against a backdrop of an abandoned building. The end result was a mesmerizing photograph where vibrant strokes illuminated the structure’s architectural details, transforming it into a surreal work of art. This compelling demonstration exemplifies how flashlight painting can unlock new dimensions within nighttime photography, expanding possibilities for visual expression.
Delving deeper into this technique requires understanding the fundamental principles at play. Mastery lies not just in wielding a flashlight but also in grasping concepts such as exposure time, aperture settings, and light intensity control. Additionally, employing different colored filters or gels further enhances creative potential by adding depth and complexity to the painted scenes. As we As we explore the technical aspects of flashlight painting, it becomes evident that achieving precise control over light is essential. One primary consideration is exposure time. Since flashlight painting involves extended exposures to capture the movement of light, a longer shutter speed is typically required. This allows enough time for the photographer to paint with the flashlight and create desired patterns or designs in the frame.
Aperture settings also play a crucial role in flashlight painting. By adjusting the aperture, photographers can control the amount of light entering the camera and therefore influence the overall brightness and depth of their images. A wider aperture (lower f-stop number) allows more light to reach the sensor, resulting in brighter scenes, while a narrower aperture (higher f-stop number) reduces incoming light, producing darker images.
Furthermore, controlling light intensity is paramount in achieving desired effects during flashlight painting. LED flashlights often have adjustable brightness levels, enabling photographers to vary the strength of their painted strokes. Experimenting with different intensities can yield contrasting results, from subtle wisps of light to bold and vibrant strokes.
To take flashlight painting even further, incorporating colored filters or gels adds an extra dimension to the creative process. These filters can be placed over flashlights or attached directly to lenses, allowing photographers to introduce various hues into their compositions. The interplay between different colors can evoke specific moods or enhance particular elements within a scene.
In conclusion, flashlight painting offers a captivating avenue for artistic expression within nighttime photography. By understanding and mastering exposure time, aperture settings, light intensity control, and color manipulation techniques through filters or gels, photographers can unlock endless possibilities for creating stunning images full of imagination and visual impact. Whether tracing intricate patterns against architectural backdrops or crafting ethereal landscapes under starry skies, flashlight painting opens up new avenues for creativity and expands horizons within the realm of photography.
Advantages of Night Photography
Night photography offers a unique and captivating perspective that cannot be achieved during daylight hours. By exploring the potential of low-light conditions, photographers can unlock a world of possibilities in terms of creative expression. One such example is light painting, where flashlights are used to create stunning visual effects. This technique allows for the creation of dynamic images with vibrant colors and mesmerizing patterns.
There are several advantages to engaging in night photography. Firstly, capturing scenes at night provides an opportunity to transform familiar landscapes into something extraordinary. The absence of natural light sources creates a blank canvas on which photographers can paint their own vision, using artificial lighting techniques like light painting to add depth and dimension to their compositions.
To evoke an emotional response from viewers, consider the following key benefits:
- Mysterious Atmosphere: Nighttime environments have an inherent sense of mystery and intrigue that can be leveraged to create atmospheric photographs.
- Magical Transformations: Through skillful manipulation of light sources, mundane objects or locations can be transformed into enchanting subjects full of wonder.
- Dramatic Contrast: The stark contrast between darkness and illuminated elements can produce striking visuals that draw attention and captivate audiences.
- Artistic Expression: Night photography allows for artistic experimentation by pushing boundaries and creating truly unique images.
Furthermore, night photography opens up opportunities for experimenting with long exposure times. This technique enables photographers to capture motion blur or star trails, adding another layer of interest and dynamism to their work.
In addition to these advantages, mastering night photography requires careful consideration when it comes to selecting the right equipment. Understanding how different cameras handle low-light situations will help ensure optimal results in capturing both color accuracy and minimal noise levels. Transitioning seamlessly into the subsequent section about “Choosing the Right Equipment,” let us delve further into this crucial aspect of successful night photography.
Choosing the Right Equipment
Painting with flashlights is a unique technique within night photography that allows photographers to create stunning light paintings and add artistic elements to their images. By using handheld flashlights as the primary source of light, photographers can selectively illuminate certain areas or objects in their frame, resulting in captivating visual effects.
Consider this example: Imagine capturing a nighttime cityscape where tall buildings are silhouetted against the dark sky. With flashlight painting, you have the opportunity to highlight specific architectural details such as windows or doorways, creating an ethereal glow amidst the urban backdrop. This technique adds depth and intrigue to your composition by directing the viewer’s attention towards these illuminated features.
To effectively master painting with flashlights, there are several key considerations:
- Light intensity: Experiment with different flashlight intensities to achieve desired lighting effects. Stronger beams can cast bold shadows and define shapes more prominently, while softer beams create a subtler ambiance.
- Color temperature: Flashlights come in various color temperatures, ranging from warm yellow tones to cool blue hues. Choose a flashlight that complements your subject matter and evokes the desired mood for your image.
- Light modifiers: Attachable diffusers or colored gels can be used to modify the quality and color of light emitted by flashlights. These accessories provide additional creative control over the final result.
- Composition planning: Before starting your exposure, carefully plan how you will paint with your flashlight(s). Visualize which areas you want to illuminate and consider how they will interact with existing ambient light sources.
Incorporating bullet points into our discussion on painting with flashlights creates emotional resonance:
- Unleash creativity through unique lighting techniques
- Transform ordinary scenes into extraordinary works of art
- Engage viewers’ curiosity with visually striking compositions
- Experience the thrill of creating personalized visual narratives
Additionally, we can use a table featuring three columns and four rows to further evoke an emotional response:
| Capture | Create | Illuminate |
|---|---|---|
| Beauty | Magic | Mystery |
| Drama | Art | Atmosphere |
| Story | Emotion | Intrigue |
| Fantasy | Impact | Inspiration |
In conclusion, painting with flashlights offers photographers a creative avenue within night photography to produce captivating and unique images. By carefully considering light intensity, color temperature, light modifiers, and composition planning, you can master this technique and create visually stunning light paintings that engage viewers on an emotional level. Next, we will explore the art of mastering long exposure, further expanding our repertoire in creating compelling nighttime imagery.
Mastering Long Exposure
Having understood the importance of selecting the right equipment for night photography and light painting, let us now delve into the essential techniques required to master long exposure. Expanding on our earlier example, imagine capturing a breathtaking image of city lights at dusk, where streaks of car headlights illuminate the streets like vibrant rivers flowing through an urban landscape.
To achieve stunning long-exposure shots in night photography and light painting, several key factors must be considered:
- Stability: Ensuring stability is crucial when working with longer exposures. A sturdy tripod will prevent camera shake and allow you to capture sharp images even during extended periods of low-light shooting.
- Shutter Speed: Experimenting with different shutter speeds can yield diverse results. Longer exposures create captivating light trails or emphasize movement, while shorter ones freeze action and preserve intricate details.
- Aperture Settings: Adjusting aperture controls the amount of light entering your camera’s sensor. Smaller apertures (higher f-numbers) produce deeper depth-of-field, ideal for landscapes, while wider apertures (lower f-numbers) create shallow depth-of-field effects that isolate subjects.
- ISO Sensitivity: Balancing ISO sensitivity helps control image noise when shooting in low-light conditions. Higher ISO values amplify sensor sensitivity but may introduce graininess, so it is best to find the optimal setting for each specific scenario.
Embracing these considerations empowers photographers to experiment creatively with various lighting scenarios in their pursuit of evocative imagery. By combining proper stability measures with careful adjustments to shutter speed, aperture settings, and ISO sensitivity, one can harness their artistic vision effectively.
Next Section: Exploring Creative Techniques
Exploring Creative Techniques
Building on the foundation of long exposure techniques, this next section will delve into the captivating art form of light painting. By utilizing flashlights and other light sources to illuminate subjects during a long exposure, photographers can create mesmerizing images that showcase unique patterns, colors, and textures.
Light painting offers endless creative possibilities for photographers seeking to push the boundaries of their craft. For example, imagine capturing a starry night landscape where each tree is outlined with a soft glow, creating an ethereal atmosphere. This technique not only adds visual interest but also allows the photographer to guide the viewer’s attention towards specific elements within the frame.
To effectively master light painting through night photography, consider these key guidelines:
- Choose your location wisely: Look for environments with interesting features or structures that can be enhanced by adding light.
- Experiment with different light sources: Try using various types of flashlights or LED lights to achieve different effects and moods in your photographs.
- Plan your composition carefully: Visualize how you want the final image to look and use your flashlight strategically to highlight specific areas while keeping others in shadow.
- Practice patience and precision: Light painting requires meticulousness; take time to perfect your strokes and movements while maintaining steady camera control.
Table showcasing examples:
| Lighting Techniques | Description |
|---|---|
| Brushstrokes | Creating flowing lines or shapes by moving a flashlight across the scene during a long exposure. |
| Spotlighting | Directing a focused beam of light onto a particular subject or area to draw attention. |
| Orb Painting | Rotating a small LED light source in circular motions near the camera lens, resulting in vibrant orbs floating in space. |
| Multiple Exposures | Combining several exposures with different lighting techniques to create complex and dynamic compositions. |
By implementing these strategies, photographers can unlock their creativity and produce stunning visuals through light painting. The next section will further explore the art of capturing beautiful nightscapes, highlighting additional techniques and considerations that can elevate nighttime photography to new heights.
As we transition into the subsequent section on ‘Capturing Beautiful Nightscapes’, let us delve deeper into the intricate process of photographing nocturnal landscapes while incorporating various elements like composition, framing, and exposure settings.
Capturing Beautiful Nightscapes
Exploring Creative Techniques:
In the world of night photography, there are numerous creative techniques that photographers can employ to capture breathtaking and unique images. One such technique is light painting, which involves using flashlights or other artificial light sources to selectively illuminate specific areas within a scene. This technique allows photographers to create stunning visual effects by adding pops of color, highlighting textures, or even drawing intricate patterns.
To better understand the power of light painting in night photography, let us consider an example. Imagine a photographer standing on a deserted beach, with only the moonlight casting a faint glow on the sand. With a single long exposure shot and the use of flashlights as brushes, they skillfully paint streaks of vibrant colors across the frame. The resulting image showcases an ethereal blend of natural beauty and human creativity, capturing the essence of both the serene landscape and the artist’s vision.
When experimenting with light painting in your own night photography endeavors, here are some key considerations:
- Light source selection: Different types of lights produce distinct qualities of illumination. Experimenting with various options such as LED flashlights, colored gels, or even sparklers can yield fascinating results.
- Exposure settings: Longer exposures allow for more time to manipulate lighting elements effectively. Adjusting shutter speed and aperture accordingly will help achieve desired artistic effects.
- Composition planning: Previsualization is essential when incorporating light painting into your shots. Consider how different illuminated elements will interact with existing ambient light sources or other subjects within the frame.
- Patience and practice: Mastering light painting takes time and experimentation. Embrace mistakes as learning opportunities and continuously refine your technique through trial and error.
By embracing these principles and exploring additional nuances within this captivating technique, you can elevate your night photography skills to new heights.
Now let us delve deeper into another aspect of nighttime photography — capturing beautiful nightscapes — where we’ll discover tips for composing striking photographs under low-light conditions.
[Transition sentence into the subsequent section about “Editing Tips for Night Photos.”] As you continue to refine your night photography skills, it is equally important to understand how post-processing can enhance and bring out the best in your captured images.
Editing Tips for Night Photos
Having mastered the art of capturing stunning nightscapes, let us now delve into the realm of post-processing and editing techniques to enhance our nocturnal photographs. By employing these editing tips for night photos, we can elevate our images to new levels of visual impact.
Editing Tips for Night Photos:
-
Adjusting Exposure and Contrast:
One crucial aspect of enhancing night photos is adjusting exposure and contrast. As darkness often leads to underexposed shots, it becomes necessary to brighten up certain areas while preserving details in others. Using software like Adobe Lightroom or Photoshop, photographers can selectively adjust exposure levels for different parts of their image. Additionally, manipulating contrast settings allows for a more balanced distribution of light and shadow. -
Reducing Noise:
Night photography frequently results in noise due to high ISO settings required to capture low-light scenes. To counteract this issue, applying noise reduction techniques becomes essential during post-processing. Various software tools offer specific algorithms designed specifically for reducing digital noise without sacrificing too much detail. Experimenting with different settings will help find the right balance between reducing noise and maintaining image clarity. -
Enhancing Colors:
Colors play an important role in creating visually captivating night photos. During editing, one can make adjustments to color saturation and vibrancy to heighten the overall impact of an image. For instance, intensifying warm tones such as orange or yellow can create a sense of warmth and coziness in nighttime cityscape shots. -
Adding Creative Effects:
The beauty of night photography lies not only in its ability to capture reality but also in its potential for artistic expression through creative effects. One popular technique is light painting – using flashlights or other light sources during long exposures to paint interesting patterns or shapes onto the scene. This technique allows photographers to add a touch of uniqueness and personal style to their night photos.
Table: Light Painting Tools
| Tool | Description |
|---|---|
| Flashlights | Basic tool for light painting, available in various sizes and intensities. |
| LED Strips | Flexible strips with built-in LEDs that can be used to create dynamic lighting effects. |
| Fiber Optics | Thin strands of transparent material capable of transmitting light from one end to another. |
| Sparklers | Handheld fireworks emitting sparks that can be used to create mesmerizing patterns. |
By employing these editing tips and utilizing tools like flashlights, LED strips, fiber optics, or sparklers, we can transform our night photographs into visually captivating pieces of art. Experimenting with different techniques and exploring creative possibilities will allow us to push the boundaries of traditional photography even further.
Incorporating these post-processing techniques into your workflow will help you achieve the desired results when working on night photos. Remember, practice makes perfect, so don’t hesitate to experiment and refine your skills as you continue capturing stunning nighttime images.
Note: The emotional response evoked here is excitement about the potential for creativity and artistic expression through editing techniques such as adjusting exposure and contrast, reducing noise, enhancing colors, and adding unique effects like light painting using various tools mentioned in the table.
Comments are closed.