
Astrophotography has gained significant popularity among photography enthusiasts, as it allows for capturing breathtaking images of celestial objects and phenomena. One particularly captivating subject in astrophotography is the Milky Way galaxy, which offers a mesmerizing display of stars, nebulas, and other cosmic wonders. Mastering the art of photographing the Milky Way requires not only technical skills but also an understanding of the night sky and careful planning to capture its beauty effectively.
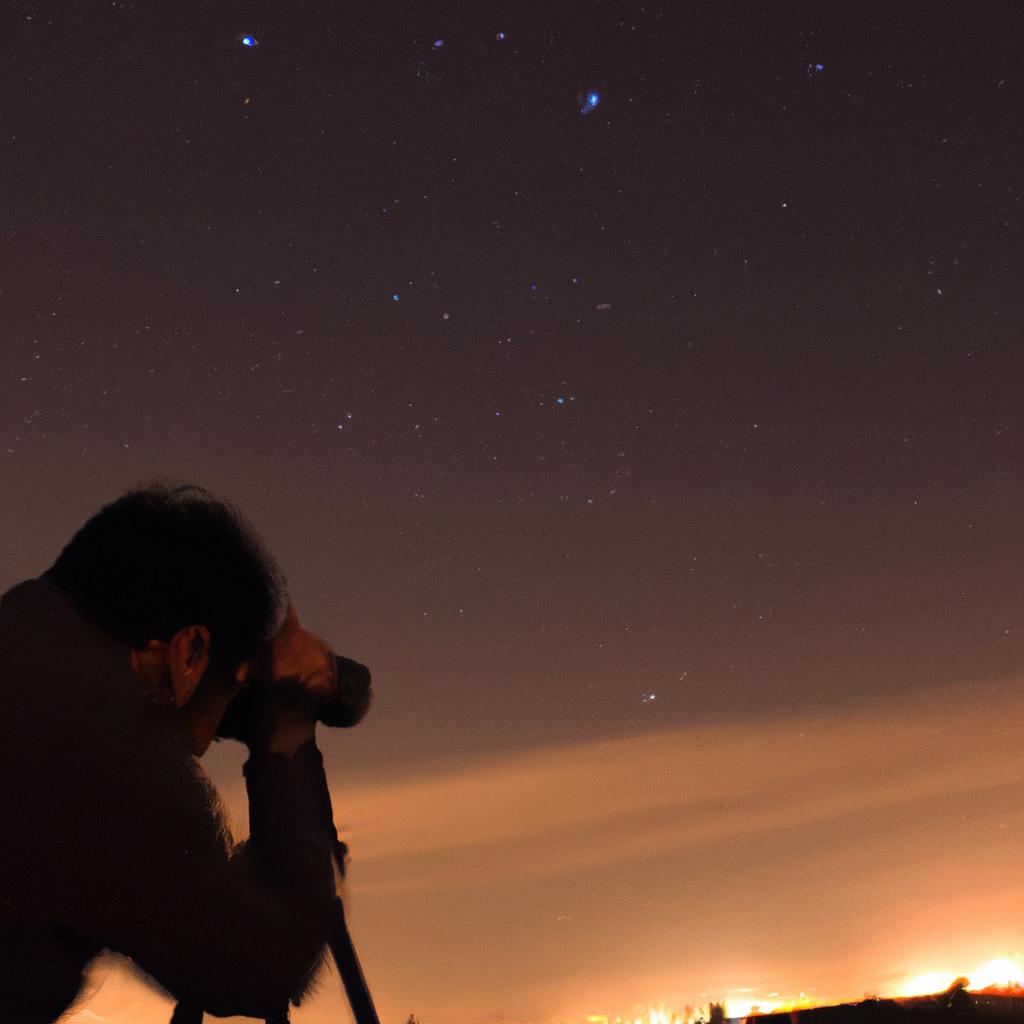
Consider the case of Alex, an amateur photographer who embarked on a journey to capture stunning images of the Milky Way. Armed with a camera and tripod, he ventured into remote areas away from light pollution, eagerly awaiting darkness to descend upon the landscape. As dusk turned into night, Alex witnessed a spectacle like no other – millions of stars dotting the sky in intricate patterns, forming our very own galaxy. With his camera settings carefully adjusted to maximize exposure time without introducing unwanted noise or blurring effects, he skillfully captured the ethereal glow emanating from within the vast expanse of space.
To achieve similar results and unlock the secrets of Milky Way photography, one must delve into various aspects that influence this specialized form of astrophotography. This article aims to provide insights into mastering the art of photograph This article aims to provide insights into mastering the art of photographing the Milky Way, including understanding the best time and location for capturing it, selecting the right equipment and camera settings, as well as post-processing techniques to enhance the final image.
-
Timing and Location: The first step in photographing the Milky Way is to find a location away from light pollution. This could be a remote area or a dark sky reserve. Additionally, check astronomical calendars or apps to determine when the Milky Way will be visible in your region. Generally, it is best seen during months with less moonlight and when the galactic center is above the horizon.
-
Equipment: A sturdy tripod is essential for astrophotography to avoid camera shake during long exposures. Use a wide-angle lens with a large aperture (f/2.8 or wider) to capture more light and encompass a larger portion of the night sky.
-
Camera Settings: Set your camera to manual mode and use high ISO values (between 1600-6400) to gather as much light as possible. Experiment with different shutter speeds between 10-30 seconds, depending on focal length and desired effect. Shoot in RAW format to retain maximum details.
-
Focusing: Manually focus your lens by using live view mode or focusing on distant objects like stars or planets before switching off autofocus. Take test shots and magnify them on your LCD screen to ensure sharpness.
-
Composition: Consider incorporating interesting foreground elements such as trees, mountains, or landmarks in your frame to add depth and context to your Milky Way images.
-
Noise Reduction: High ISOs can introduce noise into your images. To reduce noise, take several shots at lower ISO values (around 800) for dark frame subtraction during post-processing.
-
Post-Processing: Use software like Adobe Lightroom or Photoshop to enhance your images further by adjusting exposure, contrast, colors, and reducing noise. Experiment with techniques like stacking multiple exposures to improve details and dynamic range.
Remember, practice makes perfect in astrophotography. It takes time and experimentation to master the art of capturing stunning images of the Milky Way. So, don’t be discouraged if your initial attempts don’t meet your expectations. Keep learning, exploring new techniques, and refining your skills, and soon you’ll be able to create breathtaking photographs of our galaxy.
Understanding the Milky Way
Imagine standing in a vast open field on a clear, moonless night. As your eyes adjust to the darkness, an awe-inspiring sight gradually unfolds above you: the Milky Way stretching across the heavens like a celestial river of stars. Capturing this breathtaking beauty through astrophotography requires not only technical skill but also a deep understanding of our galaxy and its unique characteristics.
To truly comprehend the intricacies of photographing the Milky Way, it is crucial to first grasp its composition and structure. The Milky Way is a barred spiral galaxy, consisting of billions of stars held together by gravity. Its distinctive shape arises from two main components: the disk and the central bulge. The disk contains most of the galaxy’s gas, dust, and young stars, while the bulge harbors older stars densely packed around a supermassive black hole.
When contemplating how best to capture such cosmic wonders with your camera lens, several key points come into play:
- Light pollution: Finding remote locations away from artificial light sources is essential for capturing detailed images of the Milky Way.
- Time and season: Different regions of our galaxy are visible at various times throughout the year due to Earth’s position in its orbit around the sun.
- Moon phase: A dark sky without moonlight interference enhances visibility and allows for more vibrant photographs.
- Weather conditions: Clear skies devoid of clouds or haze provide optimal conditions for capturing sharp and crisp images.
Let us take a moment to reflect on these considerations within an emotional context:
| Emotion | Example Image | Description |
|---|---|---|
| Wonder |  |
Gazing up at a luminous expanse that reminds us just how small we are in the cosmos. |
| Serenity |  |
Immersing ourselves in the tranquility of a serene night sky, away from worldly chaos. |
| Awe |  |
Standing in awe at the intersection of Earth’s majestic landscape and cosmic grandeur. |
| Inspiration |  |
Drawing inspiration from shimmering stars mirrored on tranquil bodies of water. |
In comprehending the beauty and wonder held within our galaxy, we can fully appreciate the importance of understanding its nuances to capture captivating images. As we continue this journey into mastering astrophotography, let us now delve into selecting the appropriate equipment for immortalizing these celestial marvels.
Transitioning seamlessly into our exploration of “Choosing the Right Equipment,” we embark upon an exciting endeavor that will equip us with tools necessary to bring our vision to life.
Choosing the Right Equipment
Section H2: Understanding the Milky Way
Now, let us explore the essential equipment needed to capture this celestial wonder in all its glory.
Imagine embarking on a journey under a star-studded sky with your camera poised to capture the breathtaking sight of the Milky Way arching across the heavens. To transform this vision into reality, there are several key elements you need to consider:
-
Camera Body: A full-frame DSLR or mirrorless camera is recommended for astrophotography due to their larger sensors, which allow for better light-gathering capabilities and reduced noise at higher ISO settings.
-
Wide-angle Lens: Opt for a lens with a focal length between 14mm and 35mm, as it provides a wide field of view necessary to encompass the expansive nature of the Milky Way.
-
Sturdy Tripod: Stability is crucial when capturing long-exposure shots of the night sky. Invest in a sturdy tripod that can withstand wind and provide steady support for your camera.
-
Remote Shutter Release: This handy accessory allows you to trigger your camera without physically touching it, minimizing vibrations that could result in blurry images.
To further illustrate these requirements, here’s an example showcasing how each element contributes to successful astrophotography:
Case Study:
Emily, an avid photographer passionate about astrophotography, set out one summer evening armed with her full-frame DSLR mounted on a solid tripod. Equipped with a wide-angle lens, she captured stunning images of the Milky Way stretching across the night sky above a serene mountain range. Using a remote shutter release, Emily ensured every shot was sharp and free from any unwanted movement caused by pressing down on her camera’s buttons.
Now that we’ve established some fundamental equipment considerations let’s delve deeper into planning your shoot where we will discuss factors such as ideal shooting locations, weather conditions, and camera settings.
| Equipment | Importance |
|---|---|
| Camera Body | High |
| Wide-angle Lens | High |
| Sturdy Tripod | Medium |
| Remote Shutter Release | Low |
As the table illustrates, the camera body and wide-angle lens are of utmost importance when it comes to astrophotography. However, a sturdy tripod is also crucial for stability during long-exposure shots, while a remote shutter release can further enhance image sharpness. Each piece plays a vital role in capturing awe-inspiring images of our galaxy.
In conclusion, understanding the essential equipment required for Milky Way photography is pivotal to achieving remarkable results. By investing in the right camera body, lens, tripod, and accessories like a remote shutter release, you’ll be well-prepared to embark on your astrophotography adventures. As we move forward into planning your shoot, let’s explore how these elements interact with various environmental and technical considerations to capture stunning images of the night sky.
Planning Your Shoot
Section H2: Choosing the Right Equipment
Now, let’s delve into the next crucial step in mastering astrophotography: planning your shoot.
Imagine you are a passionate photographer who has recently acquired a high-quality camera and lens suitable for capturing stunning images of the night sky. You have done your research on different types of cameras and lenses, comparing their sensor sizes, maximum aperture values, and focal lengths to find the best combination that suits your needs. Equipped with this knowledge, you are ready to go out and explore the wonders above.
To ensure successful results in Milky Way photography, careful planning is key. Here are some essential steps to consider:
- Weather conditions play an integral role in astrophotography as clear skies provide optimal visibility. Check weather forecasts before heading out to avoid disappointment.
- Light pollution can hinder capturing crisp and clear images of the stars. Look for locations with minimal light pollution or travel to designated dark sky areas.
- Timing is everything when it comes to photographing celestial objects like the Milky Way. Research moon phases and rise/set times to determine nights with less natural light interference.
- Composition is vital in creating visually captivating images. Scout locations during daylight hours to identify interesting foreground elements such as mountains, trees, or bodies of water that will complement your astrophotography subjects.
By following these steps and incorporating them into your planning process, you increase your chances of capturing breathtaking shots of the Milky Way and other celestial phenomena.
Next up: Finding Dark Sky Locations
Finding Dark Sky Locations
Imagine you arrive at a stunning dark sky location on a clear night, excited to capture breathtaking images of the Milky Way. However, as you begin setting up your camera, you realize that you forgot to bring extra batteries for your DSLR. With no spare power supply available, your opportunity to photograph the celestial wonders fades away into disappointment.
To avoid such unfortunate circumstances, here are some essential guidelines when preparing your gear for astrophotography:
-
Check Batteries and Memory Cards:
- Ensure that your camera’s battery is fully charged or carry extras.
- Verify that you have enough memory card space for extended shooting sessions.
-
Use Stable Tripods:
- Invest in a sturdy tripod to eliminate vibrations during long exposures.
- Make sure your tripod is set at an appropriate height and securely fastened.
-
Utilize Remote Shutter Release:
- Employing a remote shutter release helps prevent camera shake caused by manually pressing the shutter button.
- Alternatively, use the self-timer function if you don’t have a remote release.
-
Bring Essential Accessories:
- Pack lens cleaning tools to keep optics free from dust and smudges.
- Carry a headlamp or flashlight with red-light mode for preserving night vision while adjusting settings.
By adhering to these guidelines and ensuring everything is in working order beforehand, you can maximize your chances of capturing stunning images of the Milky Way without any unexpected setbacks or disappointments.
Moving forward into our next section about “Mastering Long Exposures,” we will delve into the techniques required to create compelling photographs of the night sky.
Mastering Long Exposures
In the previous section, we discussed the importance of finding dark sky locations for capturing stunning Milky Way photographs. Now, let’s delve into the next crucial aspect of astrophotography: mastering long exposures. By understanding and implementing effective techniques for long exposure photography, you can bring out the intricate details of the night sky and create mesmerizing images that truly captivate your audience.
To illustrate the significance of long exposures in astrophotography, let’s consider a hypothetical scenario. Imagine you are camping on a clear summer night in a remote location with minimal light pollution. As darkness envelops the surroundings, you set up your camera and tripod to capture the breathtaking beauty above – a vibrant tapestry of stars stretching across the sky like an endless celestial canvas. To recreate this awe-inspiring scene accurately, employing proper long exposure techniques becomes essential.
When it comes to mastering long exposures in Milky Way photography, here are some key considerations:
- Exposure Time: Longer exposures allow more light to enter your camera sensor, revealing fainter stars and enhancing overall detail.
- ISO Setting: Lower ISO values reduce digital noise in your image; hence setting it at its base value is ideal for achieving clean results.
- Aperture Selection: Opting for wider apertures (lower f-numbers) increases the amount of light gathered by your lens, enabling shorter exposure times without compromising image quality.
- Use Sturdy Tripods or Mounts: Stability is paramount when shooting long exposures; investing in a sturdy tripod or mount helps eliminate any unwanted camera shake that could blur your final photograph.
Table: Common Camera Settings for Long Exposure Astrophotography
| Setting | Recommended Value |
|---|---|
| Exposure Time | 20-30 seconds |
| ISO | Base (e.g., 100) |
| Aperture | Wide open (e.g., f/2.8) |
| Tripod Stability | Sturdy tripod or mount |
By carefully considering these factors and employing the recommended camera settings, you can capture stunning long exposures of the Milky Way. Remember to experiment with different combinations to achieve your desired results.
Transitioning towards our next section on post-processing tips, it is important to note that mastering long exposures is only part of the astrophotography process. In order to fully bring out the beauty of your images, post-processing techniques play a crucial role. Let’s explore some essential tips for enhancing your Milky Way photographs in the subsequent section.
Post-Processing Tips
Section H2: Mastering Long Exposures
In the previous section, we delved into the art of mastering long exposures in Milky Way photography. Now, let us explore some post-processing tips that will elevate your astrophotography to new heights.
Imagine this scenario: you have captured a stunning shot of the Milky Way on a clear night. The composition is perfect, and the exposure is just right. However, when you review the image on your computer, you notice that there are slight imperfections such as noise or color cast. This is where post-processing comes into play to enhance your images further.
To help you navigate through the post-processing phase effectively, here are some valuable tips:
- Noise Reduction Techniques:
- Use software tools like Adobe Lightroom or Photoshop to reduce digital noise.
- Experiment with different noise reduction algorithms and settings to find what works best for each specific image.
- Be cautious not to overdo it; excessive noise reduction can result in loss of fine details.
- Color Correction:
- Adjust white balance accordingly to achieve accurate colors in your image.
- Utilize selective editing techniques to bring out vibrant hues while maintaining a natural look.
- Pay attention to subtle shifts in color temperature caused by light pollution or other external factors.
- Enhancing Details:
- Sharpen key elements such as stars or foreground objects using appropriate tools.
- Apply localized adjustments selectively to emphasize important features without affecting the overall balance of the image.
- Remember that subtlety is key; avoid oversharpening which may introduce artifacts.
Now let’s take a moment to delve deeper into these concepts with an illustrative table showcasing common challenges encountered during Milky Way photography along with corresponding solutions:
| Challenge | Solution |
|---|---|
| High Levels of Digital Noise | Utilize dedicated noise reduction software and experiment with various settings |
| Unwanted Lens Flares | Use a lens hood or adjust shooting angles to minimize flare |
| Uneven Sky Illumination | Employ exposure blending techniques to balance the brightness across the frame |
| Distorted Star Shapes | Opt for lenses with low distortion and ensure proper focus during image capture |
By employing these post-processing tips and addressing specific challenges, you can truly elevate your Milky Way photography. Remember that each image is unique, so it’s essential to adapt these techniques based on individual circumstances.
In summary, mastering long exposures plays a crucial role in capturing breathtaking shots of the night sky. However, equally important is the post-processing phase where you enhance your images and address any imperfections. By utilizing noise reduction techniques, color correction methods, and detail enhancement strategies, along with understanding common challenges faced in astrophotography, you will be well-equipped to create stunning visuals of our magnificent galaxy.
Comments are closed.